Instructions for the STAR Penny Token Board
Instructions for the STAR Penny Token Board
Download PDF
Video: Implementing the Token Board System - Introduction
Video: Implementing the Token Board System - Generalizing in Your Classroom
The Penny Token Board is designed for teachers to use during direct instruction programs such as discrete trial training (ABA) to provide immediate feedback to the student whenever the student makes a correct response.
Children with autism and other developmental delays frequently need visual cues and external motivators to provide the necessary feedback to assist them in learning a specific skill. By using the Penny Token Board reinforcement system the student will receive the needed visual feedback to let them know that they made an appropriate response.
The Penny Token Board also promotes the following learning:
- Teaches the student to wait for their reward (delayed gratification)
- Teaches the student the value of money
- Teaches the student 1:1 correspondence and other simple math skills
- Can encourage the student to have appropriate behavior during an instructional lesson (the teacher needs to reinforce appropriate behavior during the instructional lesson).
- Gives the student an opportunity to practice fine motor skills (student needs to pick up the penny and place it on the Penny Token Board).
- Encourages the student to make a correct response by providing a visual stimulus for each previous “correct response.”
- Promotes the students understanding that a line drawing represents a favorite toy, food or activity.
- Can be used to teach the student to count objects.
The Penny Token Board can be used in conjunction with the STAR Autism Program (Arick, Loos, Falco, Krug 2004) or used with any instructional program where the teacher needs to provide immediate feedback to the student.
Pennies make great token reinforcers for discrete trial programs. Using pennies, in particular, is appropriate because money is a token used in daily life. An advanced level student using the STAR Program taught us why pennies work so well. This student had been reinforced with pennies since he began instruction at the Initial Level of the STAR Program. After two years of instruction he was now learning skills at the Advanced Level of the program. One of these programs was "Money Use." After learning about the value of money he wanted to trade in his pennies to buy things he wanted. We began to have him trade in five pennies for a nickel and then two dimes and a nickel for a quarter. He then took the money he earned and put it in his pocket. Later he could "buy" itens in a store with the money he had earned.
The Penny Token Board is used to delay the student’s need for 1:1 reinforcement with a tangible reward. The Penny Token Board provides the student with both a visual and tactile immediate reinforcement for each appropriate response or set of responses during discrete trial programs. Once the student has earned fi ve pennies (or whatever number the teacher decides is appropriate) he/she then chooses a reward (e.g. toy, activity, food etc.). The teacher should have the child choose their reward (the item or activity they are working for) either before each use of the Penny Token Board, or the student can choose the reward after they have earned the fi ve pennies. The teacher will need to supply line drawings or pictures of the desired items. Children at Level I may need a concrete item placed on the penny board. * The teacher will need to adhere the velcro dots to the coins. Please refer to the picture of the Level 1, 2 and 3 boards to determine the coins needed.
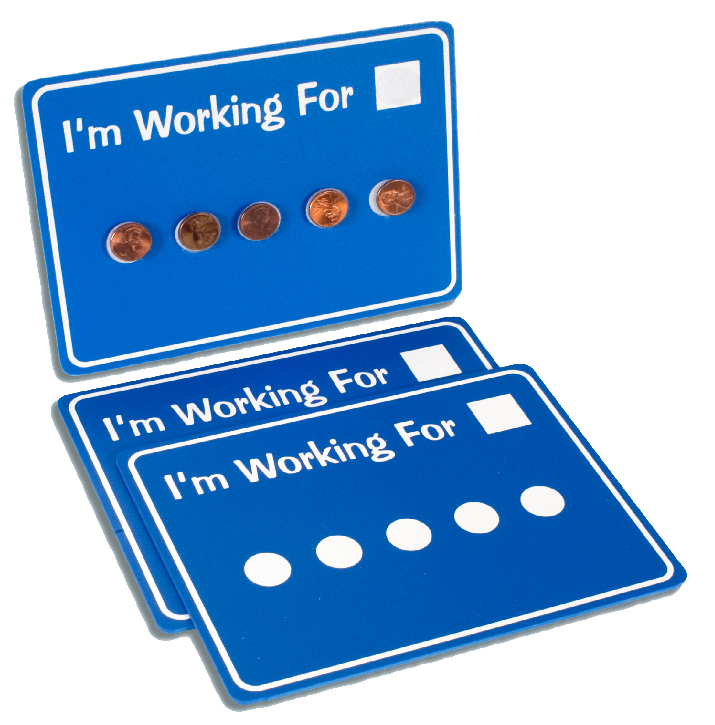
Level 1 Penny Token Board
The Level I Penny Board is appropriate for any student including students’ with no or limited functional language. Using the Level I Penny Board and a curriculum such as the STAR Program it is possible to teach the student to understand the meaning of simple nouns, to match objects/pictures/colors/ shapes, to learn to imitate simple actions, to begin to request for their desires using the phrase “I want x” and to learn to play. The Penny Token Board can be used as the reinforcement system to help teach the student how to learn these early concepts. We recommend that the student be given 1:1 reinforcement for the fi rst few sessions. After the student is comfortable with sitting in a chair and responding to the adult, the Level I Penny Token Board can be introduced. At first the student only has to earn one penny to receive the reward. during this step, the reinforcement schedule is still 1:1. The student can begin working for two pennies once the student is able to use the Penny Token Board without physical prompting from the adult. At this stage the student should be able to put the penny on the board themselves while waiting for the reward. A complete lesson plan on “How to Teach the Use of the Level I Penny Token Board” is included at the end of this manual. This process continues until the student can work for up to fi ve pennies prior to receiving their reward.
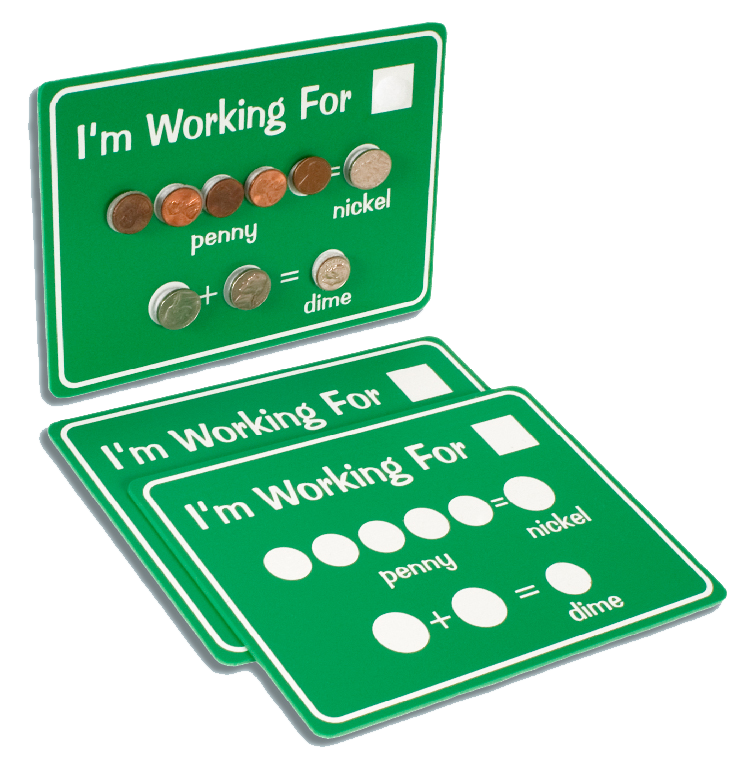
Level 2 Penny Token Board
The Level II Penny Board is designed for the student who is able to understand a few simple requests to “get or “give” objects. Prior to using the Level II Penny Token Board the student should have fi rst used the Level I Penny Token Board with success. Use the Level II Penny Board along with a curriculum such as the STAR Program to teach the student to understand many more nouns, the names of other children, teachers and family members, to use verbs and to understand that pictures can tell a story. Using the Level II Penny Board it is possible to also teach the student to begin to understand early pre-academic skills in reading, writing and math. The goal of the Level II Penny Token Board is to teach the student to use a token board in which they work for ten pennies (fi ve at a time) and trade them in for two nickels. To complete the exchange the student can trade in their two nickels for a dime.
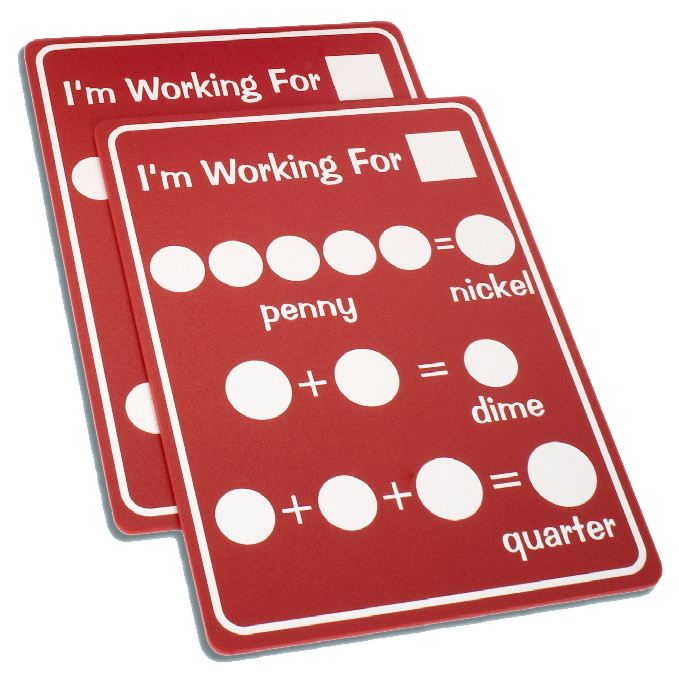
Level 3 Penny Token Board
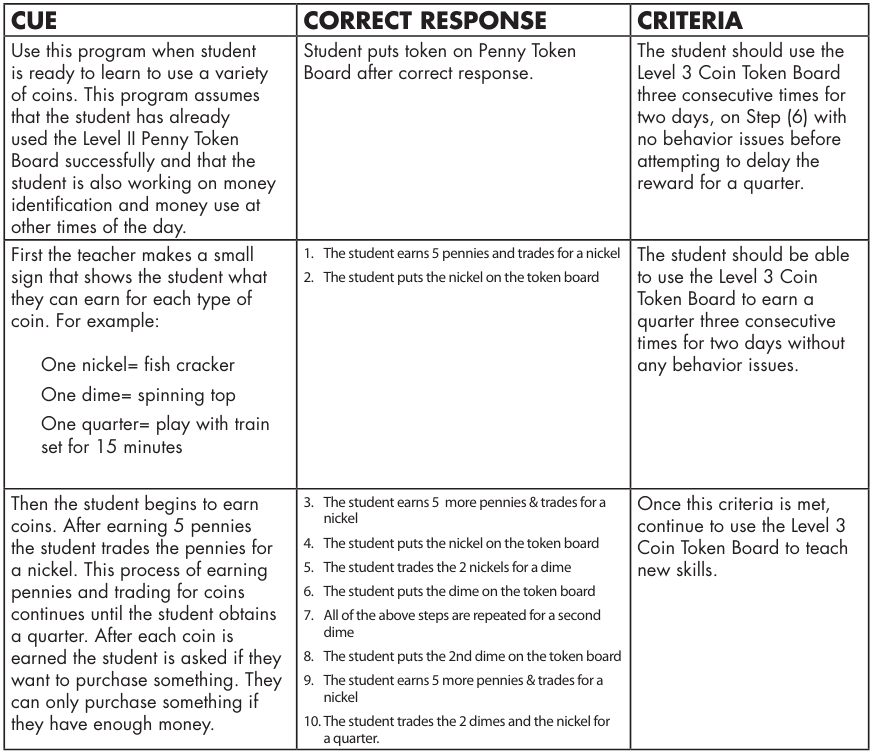
The Level III Coin Token Board is designed to help students learn to expand their language concepts and learn some early academic skills. A specially designed coin token board is included in this kit to help the student learn to identify coins and the value of money. The Level III Coin Token Board can be used in conjunction with the STAR Level III Money Use Program or any other Money Use lesson plan. Students who use the Level III Coin Token Board should have previously used the Level II Penny Board successfully. The Level III Coin Token Board will teach students to learn to respond for 10-25 responses prior to trading-in the tokens for a reward. The Level III Coin Token Board can assist the student to learn to “wait” through several responses for their reward. In fact with the Coin Token Board the student can also learn to make choices about when to “cash-in” and “what to purchase.” Here is the way it works: First the teacher makes a small sign that shows the student what they can earn for each type of coin. For example: One nickel = fi sh cracker One dime = spinning top One quarter = play with train set for 15 minutes Then the student begins to earn coins. After earning fi ve pennies the student trades the pennies for a nickel. This process of earning pennies and trading for coins continues until the student obtains a quarter. After each coin is earned the student is asked if they want to purchase something. They can only purchase something if they have enough money. A complete lesson plan on “How to Teach the Use of the Coin Token Board” is included in the manual.
Initial teaching sequence for using the Penny/Coin Token Boards:
Initially the student will need to be taught to use the Penny Token Board. After several teaching sessions, the student will quickly learn that the pennies lead to desired reinforcer. A reverse chaining procedure is recommended to initially teach the student that the tokens have a value and will eventually lead to a desired reinforcer. At first, begin with four pennies already on the token board and the student only has to earn one penny to receive the reinforcer. Over time decrease the number of pennies that are preattached to the Penny Token Board until the student is working for all five pennies. Refer to the specific lesson plans for instructions on teaching the use of the Penny Token Board. Depending on the level of the student, either a picture of the reinforcer or the actual object should be used. For a student at the Initial Level, select the actual toy, food, object and put it above the Penny Token Board slightly out of reach of the student. For the mid-level and advanced-level student, have them select a reinforcer by picking a representative icon.
Using the Penny Token Board with the Student:
- Ask the student to select a reinforcer. Depending on the student’s level use either a picture, icon or the actual object.
- After the student makes a correct response provide the student with a penny and ask the student to put the “penny on” the token board. Fade out the cue “put the penny on” as quickly as possible. Continue with the discrete trial program until the student has earned five pennies (or however many tokens the teacher has predetermined).
- After the student has earned their pennies, ask the student to hand the teacher the pennies one at a time (a student at the STAR Program Level II or III should begin to learn to count the pennies, if possible).
- The student then trades the pennies for the reinforcer.
Using the Level 3 Coin Token Board and Teaching Money Use:
- Provide the student a list/pictures of items available to buy at a “store”. This should be a variety of desirable items. The price of the items should be included on the list. There should be items that cost a nickel, dime and a quarter. The more an item costs the more valuable it should be to the student. Tell the student that they can purchase these items as soon as they have earned enough money.
- After the student makes a correct response provide the student with a penny and, if needed, ask the student to put the “penny on” the token board. Continue with the discrete trial program until the student has earned five pennies.
- After the student has earned five pennies, ask the student to count the pennies and trade in the pennies for a nickel. Have the student place the nickel on the Penny Token Board in the designated spot.*
- Repeat the sequence until the student has earned 2 nickels. Have the student trade in the 2 nickels for a dime. Place the dime on the Penny Token Board.*
- Repeat the sequence until the student has earned 2 dimes and 1 nickel. Have the student trade in the coins for 1 quarter. Place the quarter on the Penny Token Board.*
- Student trades in quarter for desired reinforcer or places money in poket to purchase an item later
For Example:
At any time the student could choose to purchase an item for a lesser amount if they have earned enough money to purchase that item.
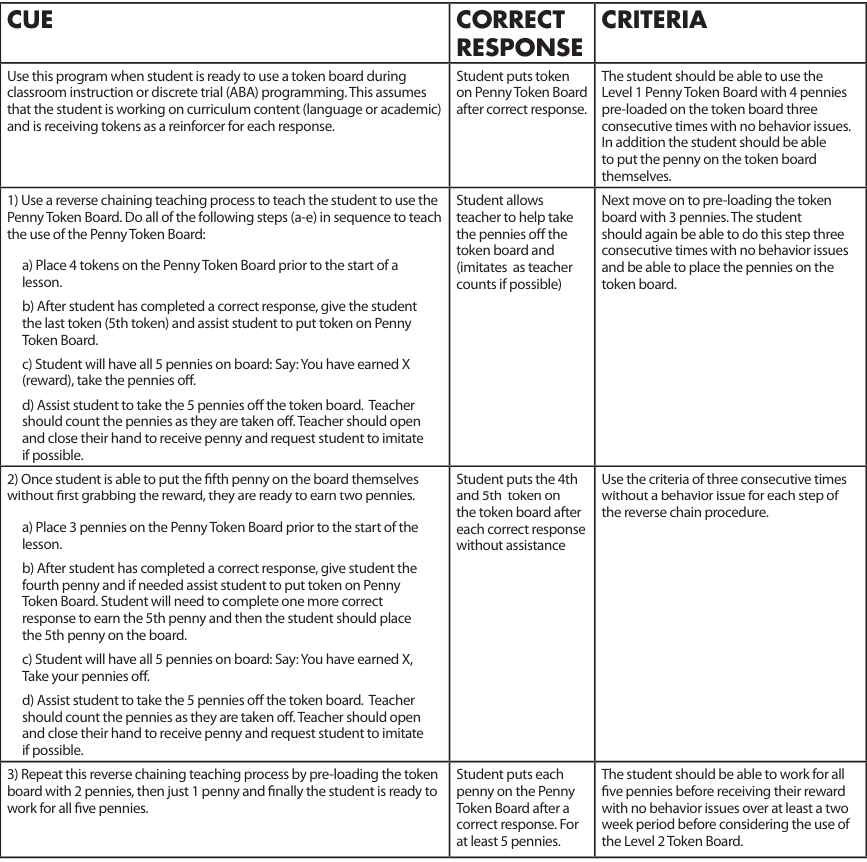
Lesson Plan 1: Using the Level 1 Penny Token Board
R+ 1:1 Penny and Social
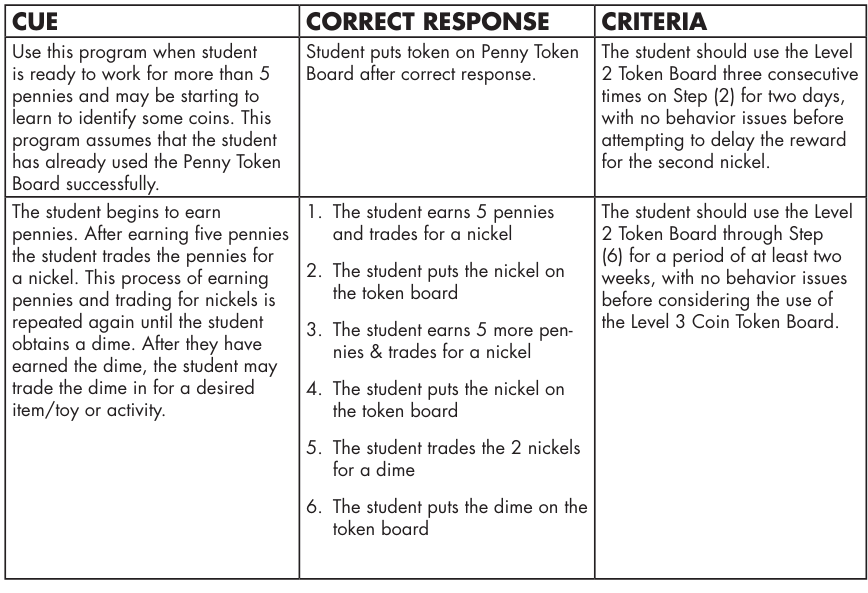
Lesson Plan 2: Using The Level 2 Penny/Nickle Token Board
R+ 1:1 Penny and Social
Lesson Plan 3: Using The Level 3 Coin Token Board & Teaching Money Use
R+ 1:1 Penny and Social